WORKSPACE
AKVIS Sketch can work independently as a standalone program as well as a plug-in to a photo editor.
To call the AKVIS Sketch plugin select the menu item Filter -> AKVIS -> Sketch in Adobe Photoshop; in Corel Paint Shop Pro select the menu item Effects -> Plugins -> AKVIS -> Sketch; in Corel Photo-Paint select the menu item Effects -> AKVIS -> Sketch.
To launch the standalone version of AKVIS Sketch follow these instructions:
- On a Windows computer:
- In the main menu: press the button Start and select from the pop-up menu the command AKVIS - Sketch.
- Using the program's shortcut on the Desktop: put the cursor on the icon of the program AKVIS Sketch and double-click it with the left mouse button.
- On a Macintosh computer:
- Using Finder: select the folder Applications on the side bar of the Finder window, select the application AKVIS Sketch and double-click it.
The workspace will be arranged according to the editing mode chosen in the Control Panel: Express or Advanced.
In Express mode, the program's interface is extremely simplified. It has the minimal set of parameters needed for a user to quickly obtain a satisfactory result.
") Workspace of AKVIS Sketch (Express) Workspace of AKVIS Sketch (Express)
In Advanced mode, the full functionality of the program is available: all parameters, under the relevant tabs Sketch, Background, Text, Canvas, as well as the toolbar.
Note: All features and parameters work in Express mode. Some are hidden and use default values or those of a chosen preset.
") Workspace of AKVIS Sketch (Advanced) Workspace of AKVIS Sketch (Advanced)
The left part of the program's window is taken by the Image Window with two tabs - Before and After. The Before tab shows the original image, theAfter tab shows the resulting pencil sketch. To switch between the tabs and compare the original and the resulting images, just left-click on any point of the image.
In the upper part of the program's window you can see the Control Panel and the following controls:
Тo the left of the Image Window there is a Toolbar with the following buttons:
- The button
 switches on/off the Preview Window (more about the preview). switches on/off the Preview Window (more about the preview).
- The button
 activates the guiding lines drawing tool Stroke Direction (available in Home Deluxe and Business versions for Classic style only). activates the guiding lines drawing tool Stroke Direction (available in Home Deluxe and Business versions for Classic style only).
- The
 , ,  and and  tools are used to outline areas for background effects. The tools are visible and active only when using eitherSketch&Photo or Sketch&Blur mode. tools are used to outline areas for background effects. The tools are visible and active only when using eitherSketch&Photo or Sketch&Blur mode.
- The button
 activates the Eraser tool used to erase the guiding lines and the effect areas outlines. activates the Eraser tool used to erase the guiding lines and the effect areas outlines.
When one of these tools is selected its parameters will appear in a window that pops up after right clicking on the tool.
Navigate and scale the image using the Navigator. The frame in the Navigator surrounds the area of the image which is visible in the Image Window; the area outside of the frame will be shaded. The frame can be dragged, thereby changing the visible portion of the image. To move the frame, place the cursor within it, left click the mouse, and then drag.
 Navigator Navigator
Additionally, you can move the image in the Image Window with the scroll bars or by holding down the space bar, then holding down the left mouse button while moving the mouse. The mouse's scroll wheel can move the image up and down, and holding Ctrl (  in Macintosh) – while using the scroll wheel will move the image left and right. Holding Alt ( Option in Macintosh) will scale the image. Right-click on the scroll bar to activate the quick navigation menu.
Use the slider or the buttons  and  to scale the image in the Image Window. When you click on the button or move the slider to the right, the image scale increases. When you click on the button or move the slider to the left, the image scale reduces.
You can also change the image scale by entering a new coefficient into the scale field and pressing the button Enter (Return in Macintosh). Frequently used scale coefficients can be found in a drop-down menu.
You can use hot-keys to change the image scale + and Ctrl+ + ( + + in Macintosh) to increase the image scale and - and Ctrl+ - ( + - in Macintosh) to reduce the scale.
Under the Navigator there is the Settings Panel where you can choose the photo-to-sketch conversion Style (Classic/Artistic); and adjust the parameters.
The Settings Panel has four tabs of settings: Sketch, Background, Text and Canvas.
- On the Sketch tab you can adjust the settings for photo-to-sketch conversion of the selected style.
- On the Background tab you can define the area of the picture that should be blurred, or the areas that should remain in their original state.
- On the Text tab you can add an inscription to your drawing.
- On the Canvas tab you can adjust the settings for the canvas, to which the resulting sketch is applied.
In the Presets field you can save the current settings as a preset to use them in the future. The current settings can be saved, edited, deleted. When you launch the program, it uses the settings of the last used preset.
Attention! The presets save only information about the settings in the Sketch, Text and Canvas tabs (not Background!).
Under the Settings Panel you can see Hints for the parameters and buttons when you hover over them with the cursor. You can choose where the hints will be shown or hide them in the program's Preferences.
TUTORIAL: AKVIS SKETCH
|
HOW IT WORKS
AKVIS Sketch converts photos into pencil sketches, the software allows to create realistic color and B&W drawings.
In order to turn a photo into a pencil sketch follow the instructions:
- Step 1. Run the standalone edition of AKVIS Sketch or open your photo editor (if you work with the plugin version of AKVIS Sketch).
- Step 2. Open an image.
- If you work with the plugin:
- Open an image in your photo editor by calling the command File -> Open or using the key combination Ctrl+O (or +O on Macintosh).
- If you work with the standalone edition:
- The dialog box Select file to open appears if you double-click on the empty workspace of the program or if you click on the button
 on the Control Panel. You can also drag the required image into the workspace of the program. on the Control Panel. You can also drag the required image into the workspace of the program.
The Standalone edition of AKVIS Sketch supports RAW, JPEG, PNG, BMP, and TIFF file formats.
- Step 3. In plug-in version only: call the AKVIS Sketch plugin select the menu item Filter -> AKVIS -> Sketch in Adobe Photoshop andPhotoshop Elements; in Corel PaintShop Photo Pro select the menu item Effects -> Plugins -> AKVIS -> Sketch; in Corel Photo-Paintselect the menu item Effects -> AKVIS -> Sketch.
- Step 4. The first time the program is opened it will be in Express mode, with a simplified interface and a minimal set of sliders, which help to quickly obtain a satisfactory result.
The AKVIS Sketch window (Express)
Experienced users who are familiar with the capabilities of AKVIS Sketch can switch to Advanced mode. Switch to this mode by clicking theAdvanced button in the Control Panel: the interface's appearance will change, granting access to the full functionality of the program.
Note: All features and parameters work in Express mode. Some are hidden and use default values or those of a chosen preset.
The AKVIS Sketch window (Advanced)
Once the program is open, part of the image will be automatically converted to a pencil drawing with the last used settings or with the settings of the AKVIS Default preset (depending on the program preferences).
The conversion result will be shown in the Before tab in the Preview Window. The quick preview area takes settings only of the Sketch andCanvas tabs.
The Preview Window is a square frame outlined with a dotted line ("marching ants"). Drag the square to the required position or draw it anew on any part of the image (double click with the left mouse) to analyse the corresponding area. The preview window disappears after image processing starts and appears again when a parameter in the Settings Panel is changed.
To compare the converted sample with the original photo, left-click on the image in the preview area.
 Preview Window Preview Window
To convert the whole image, click on  or on the After tab. After processing it is possible to switch between tabs by pressing the left mouse button on any point of the image.
 Default settings Default settings
- Step 5. Select the photo-to-sketch conversion style: Classic or Artistic; and adjust the parameters.
- Classic style lets you create color and B&W drawings with well-defined contour lines. A characteristic feature of this style is its accuracy: the image looks as if it was primarily created by contour lines with the addition of hatching. Though this mode is versatile and good for many purposes, it is the most suitable for technical illustration, architectural images, and other pictures where you would like to attain good detail.
- Artistic style is designed to create expressive drawings that look like the handmade work of a real artist. In this style, it is easy to create both a quick sketch and a carefully drawn and shaded pencil drawing. The main advantage of this style is the ability to play with hatching and to vary the number of shadings and shadows to get natural tonal transitions. This style requires a good photograph. The best results can be achieved if the original photo was taken in the right light and has good contrast.
 |  |
| Classic Style | Artistic Style |
- Step 6. Press the button to convert the original photo into a pencil drawing with the new settings.
Note: You can observe the processing in real-time. It's possible to stop photo-to-sketch rendering and save the semi-processed drawing as a result. To interrupt the process, click on the button Stop right to the progress bar or use the Timeline feature (read more about this feature below).
- Step 7. Under Home Deluxe and Business licenses, in Classic Style only, there is a function that defines the direction of the applied strokes. This special tool gives you full control over how hatching is drawn on an image. With this technique you can achieve a truly realistic drawing with patterns and textures going in the right direction.
To draw and edit the guiding lines use the tools  and  and the buttons  and  (remove/restore the last drawn line).
- Stroke Direction . Draw with the tool over the image to define the "guiding lines", along which the strokes will be drawn. The changes will be shown in the Preview Window. To process the entire image, click on the button .
- Eraser . Use this tool to erase the lines. The size of the tool can be adjusted with the parameter Brush Size (1-300).
Hint:
- For more efficient use of the Stroke Direction feature adjust the parameters under the Direction tab in Classic style.
- Guiding lines can be saved to a file with the .direction extension (with the
 button), to use them for further processing in case of work interruption. Loaded guiding lines (with the button), to use them for further processing in case of work interruption. Loaded guiding lines (with the  button) adapt automatically to the size of the image. button) adapt automatically to the size of the image.
- Step 8. If needed, adjust the settings on the Background, Canvas or Text tabs. Click on the button to start processing the image.
Note: Only Canvas as well as the Sketch tab lets you see the quick result in the Preview Window. For Background and Text you need to process the whole image to see the effect.
- Step 9. It is possible to save the settings you like as a preset and use them in the future. A preset is shared by three tabs (except the Background tab). To save a preset, enter a name for the preset into the Presets field and press the button Save. Now, as you start the program, it will use the settings of this preset. If you change the values of the parameters, you can always come back to the default settings of the preset by pressing the button Reset.
To delete a preset, select it from the list and press Delete.
To process an image with the settings of a certain preset, you should select it from the drop-down menu and press the button .
- Step 10. For the advanced types of the licenses (Home Deluxe and Business) it's possible to use the Timeline feature.
Press  to show the list of the shots created during image processing. They will be displayed at the bottom of the Image Window.
If you like some image more than your final result, click on it with the left button of your mouse. The shot will be shown in the After tab.
If you want to get back to your final result, click on the last shot in the Timeline list.
 Timeline Shots Timeline Shots
You can set the number of the shots in the Preferences dialog box.
- Step 11. In plug-in version only: press the button
 to apply the result and close the plugin window. The AKVIS Sketch plugin will close and the picture will appear in the workspace of the photo editor. to apply the result and close the plugin window. The AKVIS Sketch plugin will close and the picture will appear in the workspace of the photo editor.
- Step 12. Save the processed image.
- If you work with the plugin:
- Call the Save As dialog box using the command File -> Save As, enter a name for the file, choose the format and indicate the target folder.
- If you work with the standalone edition:
- Click on the button
 to open the Save as dialog box. Enter a name for the file, choose the format (TIFF, BMP, JPEG or PNG) and indicate the target folder. to open the Save as dialog box. Enter a name for the file, choose the format (TIFF, BMP, JPEG or PNG) and indicate the target folder.
- Step 13. The standalone edition of AKVIS Sketch allows printing the image. For this purpose press the button
 , adjust print settings in thePrint dialog box and press the button Print. , adjust print settings in thePrint dialog box and press the button Print.
TUTORIAL: AKVIS SKETCH
|
MAKE A SKETCH FROM A PHOTO: CLASSIC STYLE
Classic style lets you create color and B&W drawings with well-defined contour lines.
A characteristic feature of this style is its accuracy: the image looks as if it was primarily created by contour lines with the addition of hatching. Though this mode is versatile and good for many purposes, it is the most suitable for technical illustration, architectural images, and other pictures where you would like to attain good detail.
 Pencil Sketch from Photograph: Classic Style in AKVIS Sketch Pencil Sketch from Photograph: Classic Style in AKVIS Sketch
(Move your mouse over the image to see the original version)
In the Sketch tab you can adjust the parameters for the photo-to-sketch conversion.
There are four parameter fields in the Classic style: Effects, Strokes, Edges, Direction.
Note: You can see the conversion result immediately, as you move the slider, only in the Preview Window. To convert the whole image, press the button or click on the After tab.
- Watercolor. The Watercolor parameter lets you create watercolor drawings. This parameter accepts values between 0 and 50. By default it is set to 0 which corresponds to a pencil drawing. As you move the slider to the right (that is, increase the value of the parameter) the strokes get blurred, contrast and detail get weaker, as if the strokes were drawn on wet paper. The higher the value of the parameter, the stronger the effect.
 |
| Watercolor = 10 |
- Charcoal. The parameter changes the drawing technique from a fine pencil drawing to charcoal. The higher the value of the parameter, the more it looks like the charcoal technique.
 |
| Charcoal = 7 |
- Coloration. The effect adds color to a drawing provided by the color information from the original image (if the image is not grayscale). The parameter accepts values between 0 and 100. By default the value is set to 0, which corresponds to a graphite pencil sketch, in this case the pencil sketch is not mixed with the original image.
As you move the slider to the right, the drawing gets colors from the original image. If at the same time the parameter Watercolor has a value higher than 0, the sketch looks very similar to a watercolor drawing.
 |
| Coloration = 40 |
- Smudging. The parameter creates the effect of smearing hatching in midtone areas without affecting the contour lines of the drawing. This technique looks like a result of rubbing across a drawing with a stump tool, smooth paper, or a finger. The parameter accepts values between 0 and 30. By default it is set to 0 at which there is no smudging effect. At higher values the appearance of shaded areas changes. Shading becomes similar to soft graphite. It is a fast and simple way to add a soft and blurred texture to a sketch.
 |  |
| Smudging = 0 | Smudging = 30 |
Strokes tab (hatching parameters):
- Color Pencil. When the check-box is enabled, the program imitates a color pencil drawing. When the check-box is disabled, the strokes are black.
 |  |
| The check-box "Color Pencil" is enabled | The check-box "Color Pencil" is disabled |
When the check-box Color Pencil is enabled, you can change the Saturation of the image by moving the slider to the right of the check-box. As the value of this parameter is increased, the intensity of colors in the image become more intense, and colors of the strokes become more "bright".

Saturation = 0 | 
Saturation = 100 |
- Angle. This parameter Angle sets the pitch angle of the strokes when hatching a uniform area (an area that does not contain edges and intensity swings). By default the strokes in such areas are drawn at a 45 degree angle. The parameter has values between 0 and 180 degrees; the step is 5 degrees.
 |  |  |
| Angle = 45 | Angle = 135 | Angle = 90 |
- Stroke Thickness. This parameter sets the stroke size. If you reduce the value of the parameter the strokes on the picture get thinner and harder, if you increase the value the strokes get wider and blurred on their edges.
 |  |
| Stroke Thickness = 5 | Stroke Thickness = 9 |
- Min Length/Max Length. This parameter sets a range within which the stroke length can vary. There are two sliders to define the range borders: the left slider sets the minimum length, the right slider sets the maximum length. The resulting sketch will be made up of strokes that fall within this range.
If you reduce the minimum length, the number of strokes and the detail of the image increase. Visually the drawing becomes darker. If you increase the value of the minimum length, the number of strokes is reduced (strokes shorter than the set minimum do not get drawn). Visually the image becomes lighter and neater.
If you increase the maximum length, the hatching becomes less uniform. The higher the value of this parameter, the longer strokes can be drawn on the picture. However, if the value is too high it may worsen the precision of the hatching.
 |  |
| Min Length/Max Length=1/4 | Min Length/Max Length=8/16 |
- Midtones Intensity. This parameter defines the intensity of the midtone strokes, as if drawn with different pressure. As you move the slider to the left, the midtone strokes fade - becoming dim and blurred. As you move the slider to the right the midtone strokes become thicker and more intensive.
 |  |
| Midtones Intensity = 1 | Midtones Intensity = 10 |
- Midtones Hatching. This parameter defines the level of hatching in the midtone areas. If you want to reduce hatching move the slider to the left.
 |  |
| Midtones Hatching = 1 | Midtones Hatching = 100 |
Edges tab (parameters that affect how edges are drawn):
Direction tab (parameters to control hatching direction):
The parameters under this tab affect hatching when the Stroke Direction tool is used .
The Stroke Direction tool gives you full control over how hatching is drawn on an image. Use this special tool to define the guiding lines, and the program will convert the image into a sketch, directing the hatching to follow them. With this technique you can achieve a truly realistic drawing with patterns and textures going in the right direction.
The tool is not available for the basic Home license; it is active only for advanced licenses like Home Deluxe, Business.
You can use it more effectively by adjusting these parameters:
|
TUTORIAL: AKVIS SKETCH
|
MAKE A SKETCH FROM A PHOTO: ARTISTIC STYLE
Artistic style is designed to create expressive drawings that look like the handmade work of a real artist.
In this style, it is easy to create both a quick sketch and a carefully drawn and shaded pencil drawing. The main advantage of this style is the ability to play with hatching and to vary the number of shadings and shadows to get natural tonal transitions. This style requires a good photograph. The best results can be achieved if the original photo was taken in the right light and has good contrast.
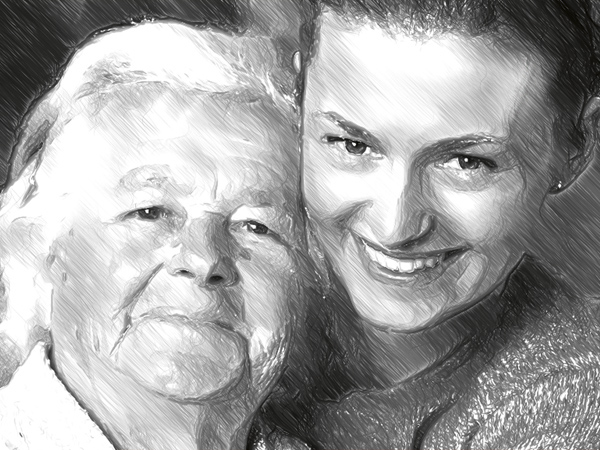 Pencil Sketch from Photograph: Artistic Style in AKVIS Sketch Pencil Sketch from Photograph: Artistic Style in AKVIS Sketch
(Move your mouse over the image to see the original version)
In the Sketch tab you can adjust the parameters for the photo-to-sketch conversion.
The parameters in the Artistic style are grouped in two tabs: Strokes and Edges.
Strokes tab (hatching parameters):
Edges tab (parameters that affect how edges are drawn):
Hint: We recommend to adjust edges while the hatching is off. To do this, set Hatching Density to zero (in the Strokes tab).
TUTORIAL: AKVIS SKETCH
|
BACKGROUND EFFECTS
Use the Background tab to process the converted image further. It is possible to imitate a blend of the original photo and the drawing or to blur some parts of the image.
This tab can be used to put an accent on a certain fragment of the image or to enliven a picture by adding motion. For example, it is possible to separate the background from the object (a plane or a bird in the sky; a soft toy on a sofa; a vase with fruit, etc.) or to single out one object among several equivalent objects (one person in a group photo, the most beautiful flower in a garden image, etc.) and many other things.
Sketch
In this mode the Background tab has no influence on the image. In other words, the additional background effects are disabled.
It is the default mode in which the first tab (with the parameters for the photo-to-sketch conversion) works only.
 The result of processing in the "Sketch" mode The result of processing in the "Sketch" mode
Sketch&Photo
In this mode you can get a blend of a drawing and a picture - only the defined parts of the image will be converted into a drawing.
 The result of processing in the "Sketch&Photo" mode The result of processing in the "Sketch&Photo" mode
When this mode is enabled, the following tools appear on the Toolbar, on the left of the Image Window. These tools define, which areas will be converted to a drawing, and which not.
- The Effect Area tool . Use the blue pencil to draw an outline within the areas that will be converted to a drawing in accordance with the parameters of the Sketch tab.
- The No Effect Area tool . Use the red pencil to outline the parts of the image that will remain in their original state.
- The Eraser tool . Use this tool to edit the outlines drawn by the pencils. When Sketch&Photo (or Sketch&Blur) is active, the tool can operate in three different modes:
- Erase all lines (both guiding lines and zone lines of the background effects);
- Erase only guiding lines (direction of the strokes);
- Erase only zone lines (background effects).
Adjust the size of the pencils and of the Eraser tool using the Brush Size parameter.
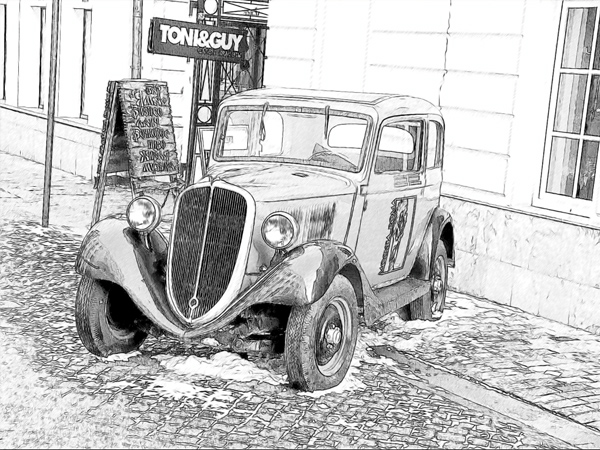
 Drawn outlines Drawn outlines
Effect Area (blue): the pencil drawing
No Effect Area (red): the original photo (car)
Note:
|
If only blue lines or no outlines are drawn, the image remains a drawing. If only red lines are drawn, the image will be restored to its original state (the input image).
|
Attention!
|
During processing you will see that the whole image (regardless of the drawn lignes) will be converting into a drawing. Don't worry. It's only one of the processing steps, not an error. In the next step the program will take into consideration the settings of the Backgroundtab.
|
The Grayscale check-box. When the check-box is enabled, the parts of the original image marked with red (or green) are converted to grayscale.
It does not work, if the Color Pencil option and the Coloration effect in the Sketch tab are selected.
Use this option to get the entire image in b&w, not only the "drawing" part.
 |  |
The "Grayscale" check-box is not selected:
the original color photo (car)
and the drawing around | The "Grayscale" check-box is enabled
the original photo converted in black-and-white (car)
and the drawing around |
Sketch&Blur
In this mode it is possible to blur the defined parts of the image. In the Toolbar you will find the following tools: Effect Area , Eraser , and the Blur Area . The latter is used to define the areas that must be blurred.
Select a Blur Method that will be used in image processing and adjust the parameters.
- Gaussian Blur. When this method is selected, the program recalculates the color components (red, blue, and green) for every point of the image, taking into account the corresponding values of the neighbouring points; as a result the points change their colors. The calculation is based on the Gaussian distribution and is named after it. In this way the values of the color components are averaged and the contrast between them weakens. The sharp borders are blurred without general lightening or darkening. The image gets dim, «cloudy».
 Gaussian Blur Gaussian Blur
The Radius parameter adjusts the strength of the effect application. It defines to what extent a point influences on the neighbouring points when its color components are being recalculated. At low values only the adjacent points will be changed. Every point will undergo a slight change, but the blurring will be visible. The higher the value of the parameter, the wider is the influence area of every point. The image will get more blurred till it becomes completely indiscernible and looks like one stain (at high values of the parameter).
 |  |
| Radius = 3 | Radius = 8 |
- The Motion method. This blur method imitates the straight line motion of a camera.
 Motion Blur Motion Blur
Parameters:
Angle. This parameter sets the inclination angle of the line, along which the effect will expand to the image. The values of the parameter vary between 0 and 180 degrees. At exactly these values the blurring will be horizontal. At value = 90 the blurring will be vertical.
 |  |
Angle = 45,
Reach = 20 | Angle = 135,
Reach = 20 |
Reach. This parameter defines the zone of effect application in pixels (relative to every point of the image).
 |  |
Reach = 10,
Angle = 135 | Reach = 30,
Angle = 135 |
- Radial Blur. This method imitates motion, too. There are two kinds of motion:
Spin. This mode imitates the effect of a camera rotating around the central point of the image, which results in circular blurring.
 Radial Spin Blur Radial Spin Blur
Zoom. This mode creates blurring directed away from the center.
 Radial Zoom Blur Radial Zoom Blur
The rotation angle in Spin mode and the effect application area in Zoom mode are adjusted with the Amount parameter.
 |  |
Amount = 20,
Spin Blur | Amount = 40,
Spin Blur |
 |  |
Amount = 20,
Zoom Blur | Amount = 50,
Zoom Blur |
In the Sketch&Blur mode you can choose one of the following methods of the result image generation (Blur Order).
TUTORIAL: AKVIS SKETCH
|
ADD TEXT TO PENCIL DRAWING
You can personalize your work of art by adding a signature to your pencil drawing, create a postcard by placing greeting text to the image.
Switch to the Text tab to add an inscription to your drawing.
 Text tab Text tab
Type the text into the field (max 250 characters). By default the parameters of the tab are disabled; for the inscription to appear on the image, you should enable the check-box Use Text.
There are three groups of parameters:
|
|
|
|
|


No comments:
Post a Comment